As many knitters believe, inserting lifeline during knitting can put you on ease whenever the unthinkable happens. Nightmare for lace knitter is when a stitch (or more) dropped and the beautifully knitted lace started to unravel, resulting in a wasted hard work. You know how the yarn can easily unravel on lace (damn those yarn overs!), and they unravel faster if you are using fine yarn. It breaks my heart even to think about it.
I myself rarely use lifeline whenever I knit lace. However, when I knit my fountain pen shawl, I somehow dropped stitch more often than I usually do. So, I thought, maybe this is the time when I should use a lifeline.
Why lifeline is important?
Basically, lifeline is to help further damage caused by unraveling. Other the other side, when you made mistake, such as forgetting to yarn over or to k2tog in a repeat (and causing the pattern to "shift"), you can unravel your work until the lifeline, without fearing that your project will change into further stitch mess.Use lifeline whenever you are unsure about your knitting project, allowing you to restart without tears. I also use lifeline when I am not sure with the Bind-off method. I always have problem with bind-off. If you are unsure with the bind-off, put the lifeline 2-3 rows below bind-off row. After you block the project, you can redo the bind-off if you are unhappy with the result.
Lifeline can be inserted anytime during knitting project. But, wise knitter would choose the "easy row" of the repeat, rather than to insert it during the difficult part. "Easy row", for example, is a row that contains "knit and/or purl all stitches". No yarn overs, no k2tog, no ssk, or other decrease/increase or knitting maneuver. A clear easy row allows you to insert lifeline by using tapestry needles. Some needles (such as knitpicks' interchangeable circs) provide features that help you in inserting lifeline. I use similar method, but this method can be applied on any kind of needle, and can be applied on any row you want.
Materials you need:
- The lifeline yarn. Note that you must use yarn smaller than you are using for your project. Any yarn, new or waste, that has clean and smooth yarn surface, without fiber flying around is perfect. Mohair or eyelash yarn definitely not a good choice for a lifeline yarn. I chose cotton which strand does not easily strays. In fact, I use a beading yarn that is usually used for chinese knots.
Fig. 1 shows some selection of yarn, I used the middle one.
- sellotape, choose a thin sellotape. Plastic sellotape or paper sellotape are good enough.
- scissors
 |
| Fig. 1 |
Method
Step one, attach the yarn to the circular needle you are currently using. The best area to attach the yarn is at the very back of the needle, just before entering the cable of the circular (Fig. 2)
 |
| Fig. 2 |
Make sure that the front tip of the yarn is aligned with the sellotape (Fig. 3).
 |
| Fig. 3 |
NOTE: If you are using single pointed needles or dpns, attach the yarn at about 6-8 cm (2.5 inches) from the front needle tip.
 |
| Fig. 4 |
After you attach the yarn, cut the excess sellotape. On the fig.4, you can see that the yarn is securely attached to the needle, and the knitting needle is now ready for use.
Step two, knit as your pattern indicate. Move the stitches towards the knitting needle's cable as you knit the row. If your lifeline yarn is aligned with the sellotape, the stitches can be easily moved to the needle's cable (Fig. 5).
 |
| Fig. 5 |
When you finished the row, make sure that you push all the stitches that you have knitted to the needle's cable, make sure that the lifeline yarn has entered all the stitches (Fig. 6).
 |
| Fig. 6 |
Step three, remove the lifeline yarn from the needle (not from the row) by pulling the lifeline yarn toward the needle tip (Fig. 7A and B). This will tear the sellotape. After that, clean the sellotape leftovers (Fig. 7C).
 |
| Fig. 7A |
 |
| Fig. 7B |
 |
| Fig. 7C |
If the lifeline yarn still attached to a yarn ball/cone, you can cut them now. If you intend to have the lifeline until you finished blocking, add approximately 10 cm (4 inches) from the length of the row: that is the lifeline yarn length you needed. To make sure that the lifeline would not accidentally pulled out from the stitches, make a knot from both ends of the lifeline yarn (so it makes a loop of a lifeline yarn). Don't worry, you can remove the knot during blocking.
Note: If you are using dpns, be very careful when moving the stitches to the back of the needle. If you are working with many stitches, using a needle point protector at the back end would not hurt you.
Step four, knit the next row as your pattern indicates. Careful not to knit the lifeline yarn.
 |
| Fig. 8 |
Extra notes:
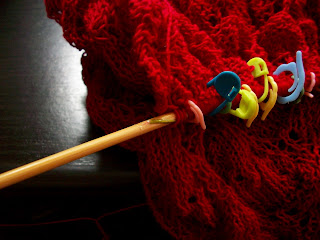
If you are using markers on the needle (not on the stitch), make sure that you are using open markers. If you are using closed loop markers, remove the marker while inserting the lifeline. Or, if you are afraid that you'll lost count, change the close loop markers with a waste yarn marker, and change it back to close loop markers when you knit the next row. The waste yarn will stay with the lifeline yarn.
 |
| Fig. 9 |
On Fig. 9, the left stitch marker is what I called "close loop markers", the middle and the right stitch markers are what I called "open markers".
Hope this tutorial is useful for you ^^.
happy knitting!


